
This is a quick article on how I built my 2022 workstation and got 5 monitors working with only 1 graphics card.
Why?
This took me a good few hours to get working so I thought this article could help others. It's also a chance to show off my build. Although not high budget like lots of YouTubers I drew inspiration and advice from, it's my first build in a long time. It's always been a dream of mine (see my pinterest) to build a nicer looking computer and I was given £1000 towards a new computer... It's more than enough to get a running White Snow Edition PC but I put in some more to get the Graphics Card, more RAM, more fans, more...
What I had:
| Personal Home PC | Work-from-Home PC | |
|---|---|---|
| Case | Antec Fusion Black 430 | Dell OptiPlex 9020 Micro Form Factor |
| CPU | i3 4th Gen | i7 4th Gen |
| RAM | 4Gb | 8Gb |
| GPU | Nvidia Geforce GT 610 | ??? |
| O/S | MS Windows 7 Pro (32-bit) | MS Windows 10 Pro (64-bit) |
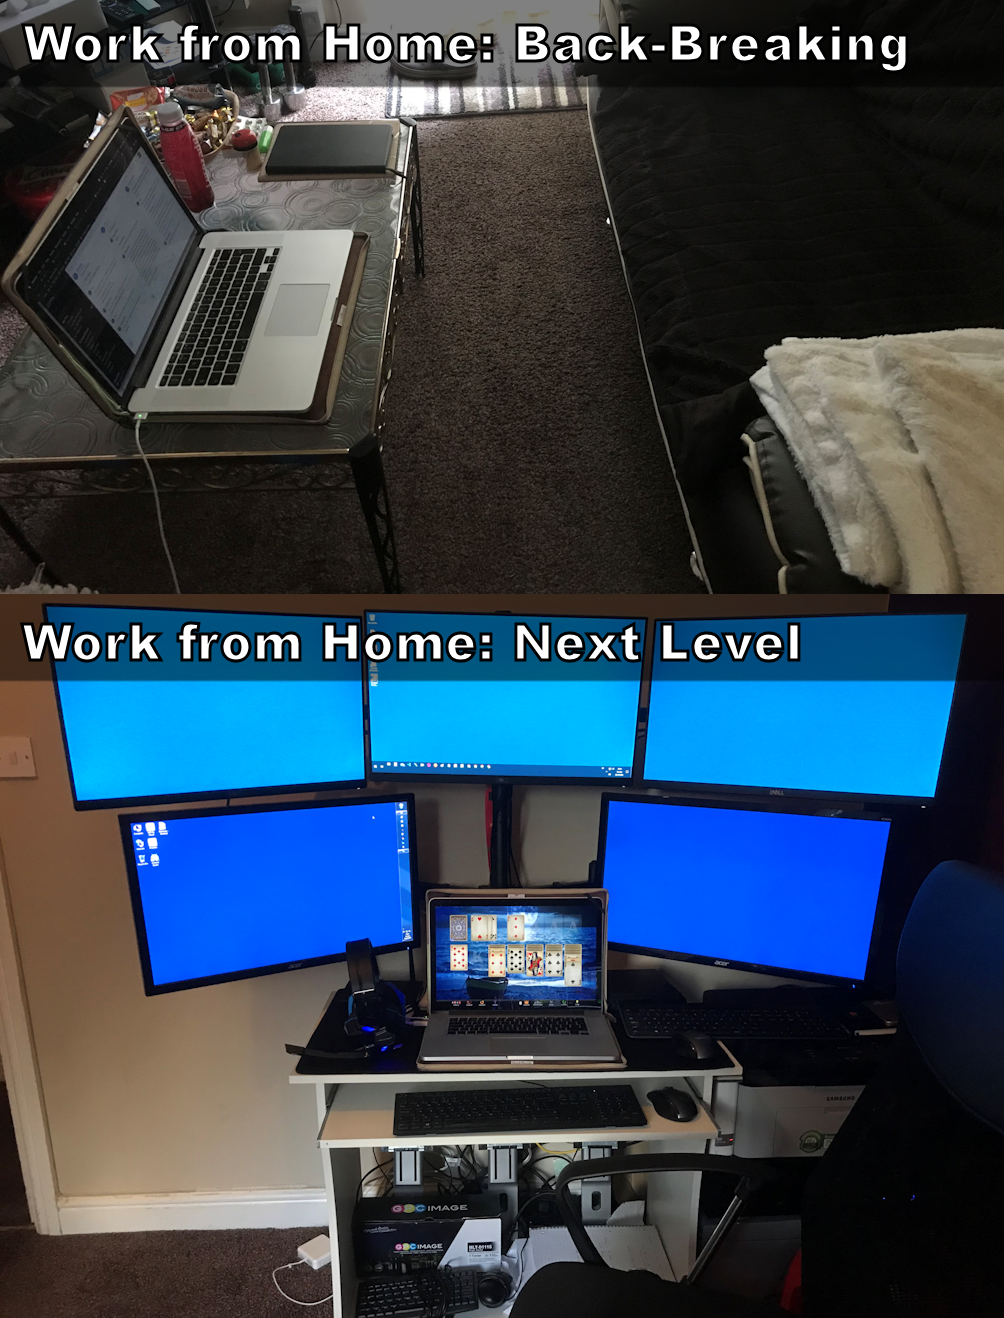
Here's a photo of my previous setup (when Lockdown due to COVID-19 first happened). The work PC connected to the 3 monitors at the top and the home PC connected to the 2 monitors underneath:
How?
My upgrade for 2022, is that all monitors are now connected to my home PC. The way to do this might be different for you depending on the components of your PC. So here's a list of what I used:
| Type | Component | Quantity | Price (GBP) |
|---|---|---|---|
| Reused components | |||
| Monitor | Acer K242HL | 2 | ~@£100.00 (at time of purchase) |
| Monitor | Dell U2414Hb | 3 | ~@£250.00 (at time of purchase) |
| Monitor Arms | Suptek Hex Clamp Monitor Arm Stand For 13"-27" | 1 | ~@£151.00 (at time of purchase) |
| New components | |||
| Case | Lian-Li 011 Dynamic Mini Snow Edition | 1 | £114.88 |
| Motherboard | NZXT N7 Z490 White ATX Motherboard (Intel) | 1 | £195.21 |
| CPU | Intel Core i9-10900 (LGA1200 65w) | 1 | £369.88 |
| RAM | Corsair Vengeance RGB PRO SL DDR 3600Mhz C18 (2x16Gb) | 2 | @£132.99 |
| GPU | Zotac GeForce RTX 3060 12Gb AMP White Edition | 1 | £519.99 |
| HDD | WD Blue SN570 500Gb M.2 2280 PCIe Gen3 NVMe | 1 | £52.98 |
| PSU | Cooler Master V750 SFX Gold White Edition | 1 | £120.00 |
| AIO | ID-Cooling Zoomflow 240X Snow CPU Water Cooler | 1 | £74.99 |
| O/S | Microsoft Windows 11 Pro 64-bit | 1 | £219.99 |
| Case Fans | CoolMoon 3 Pack 120mm Crystal | 3 | @£28.99 |
| Monitor Cable | KabelDirekt - DisplayPort to DVI adapter cable 2m dual link | 1 | £9.89 |
| Additional | iYueshare 120mm Magentic Mesh Filter Cover Grill (2 pack) | 1 | £8.90 |
| Additional | Power Supply Sleeved Cable (White) | 1 | £19.99 |
| Build & Cost Breakdown | |||
| Initial Build Total (functional PC, onboard GPU, 32Gb RAM, Previous O/S): | £1,099.81 | ||
| Second Part Build Total (GPU, RAM doubled, Windows 11 Pro, other): | £959.84 | ||
| Total: | £2,059.65 | ||
| Not Used | |||
| Case Fans | 2 fans from the 3rd pack of the CoolMoon 120mm Crystal | - | - |
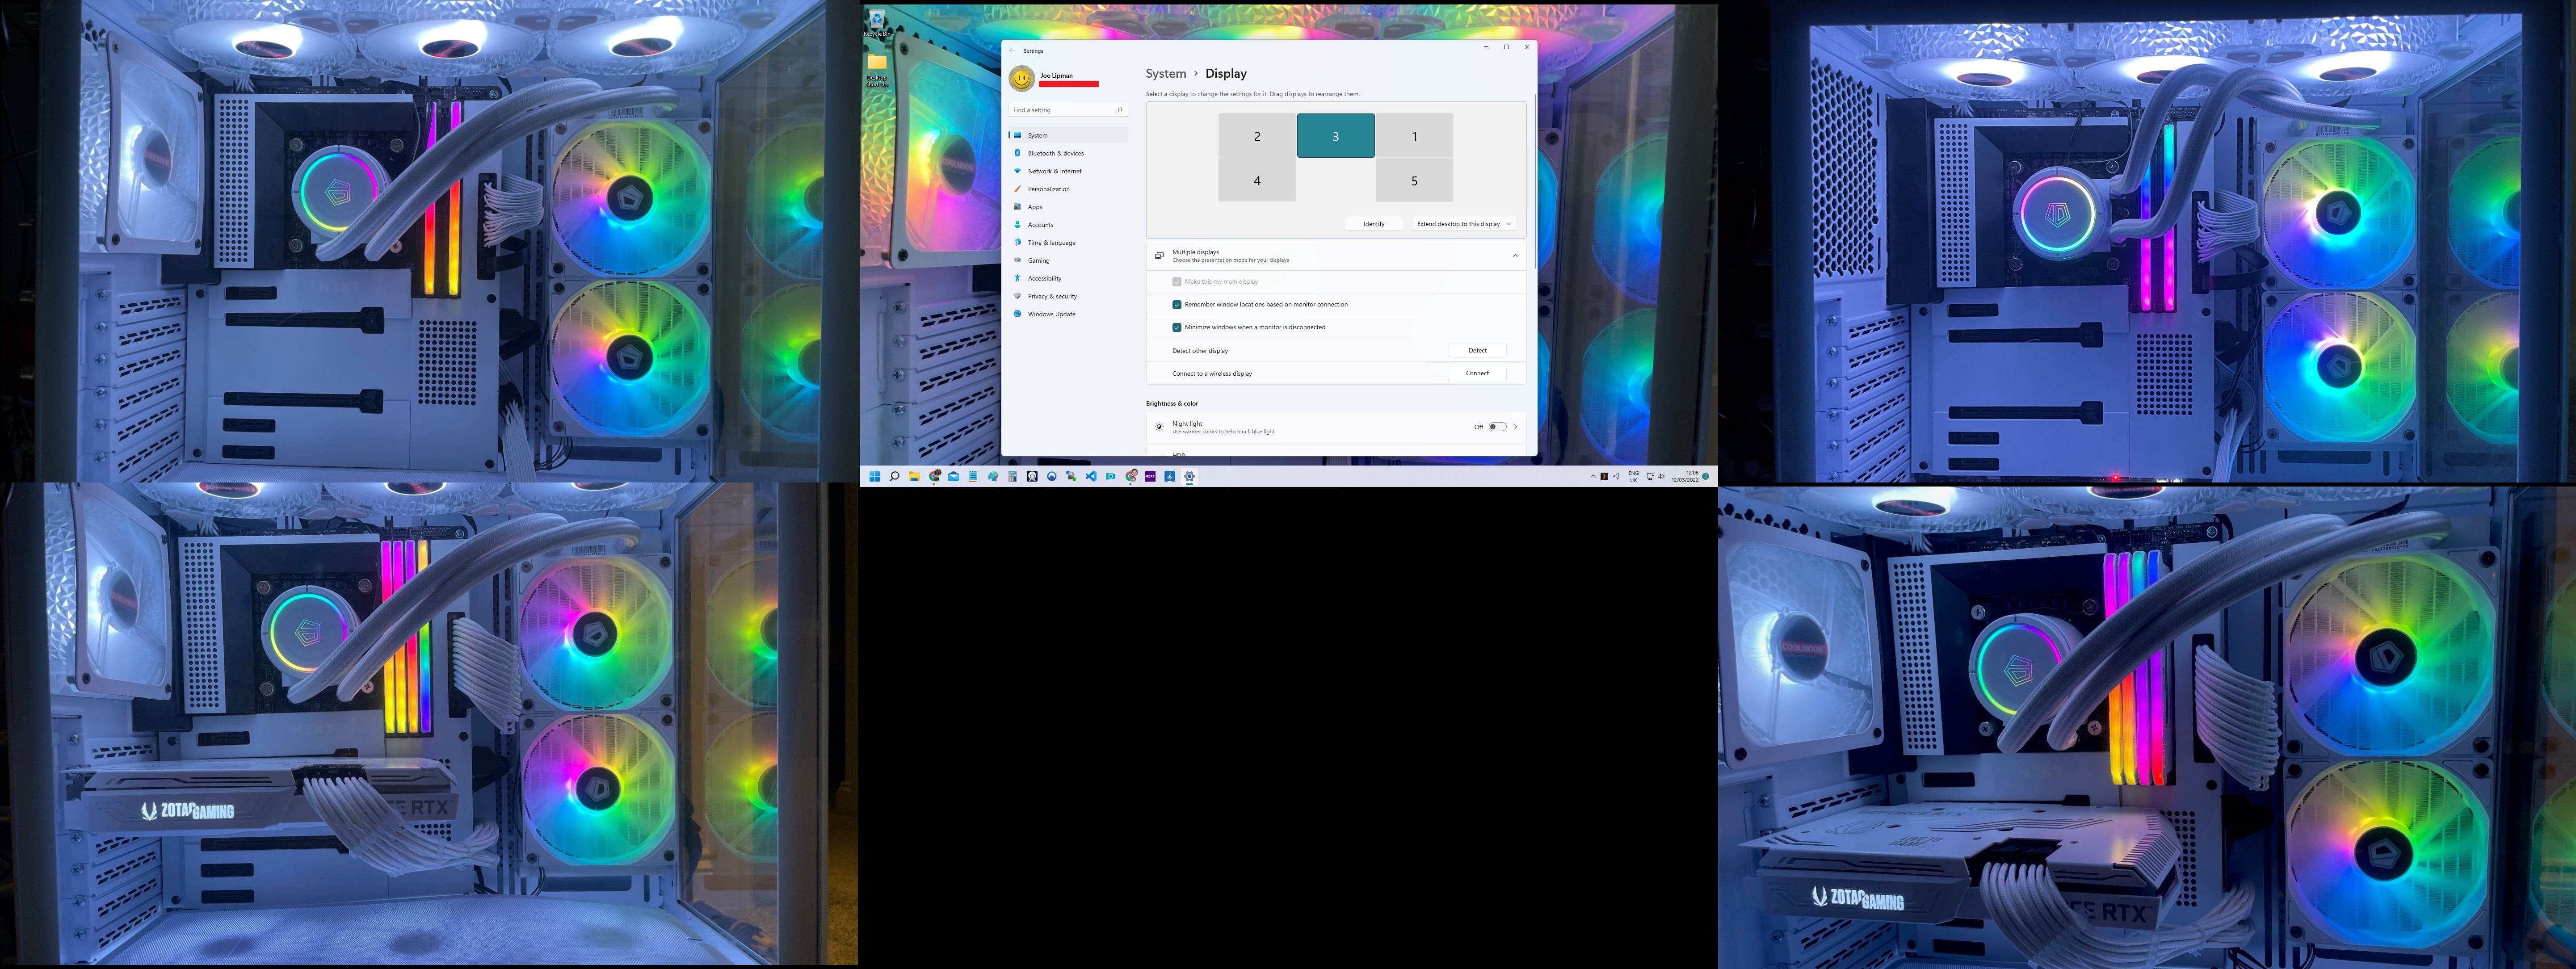
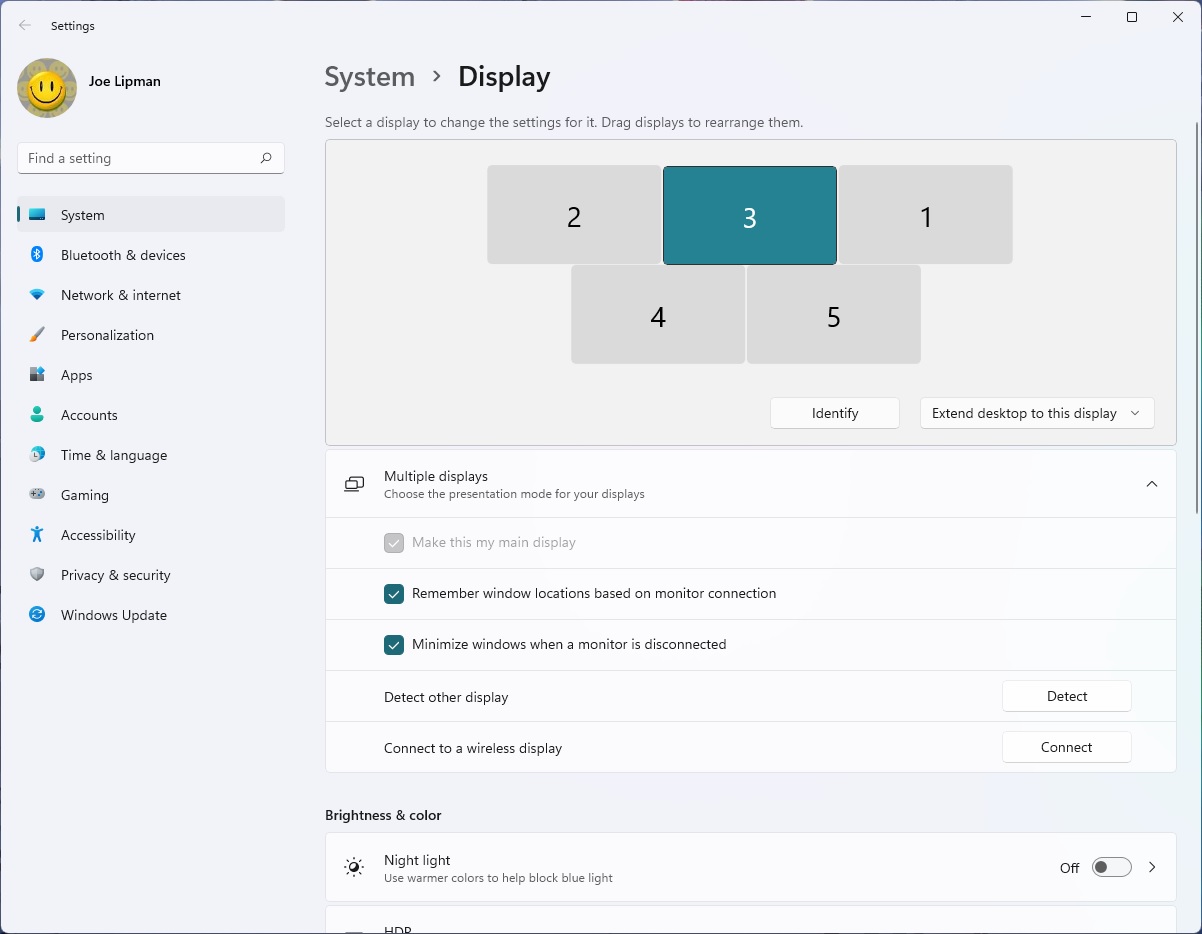
The Result:
Monitor cable connections
I need to practice what I preach: "it's a poor workman who blames his tools". Let's make do with what we have. The 2 Acer monitors only have DVI and VGA inputs. The 3 Dell monitors can daisy chain with a combination of DisplayPorts and Mini-DisplayPort, which means that only 1 DisplayPort cable needs to go the PC. They also have 1 HDMI input. The NZXT Z490 Motherboard I have only has 1 HDMI port. Here's a crude diagram of what I had:
Previous Setup Diagram:
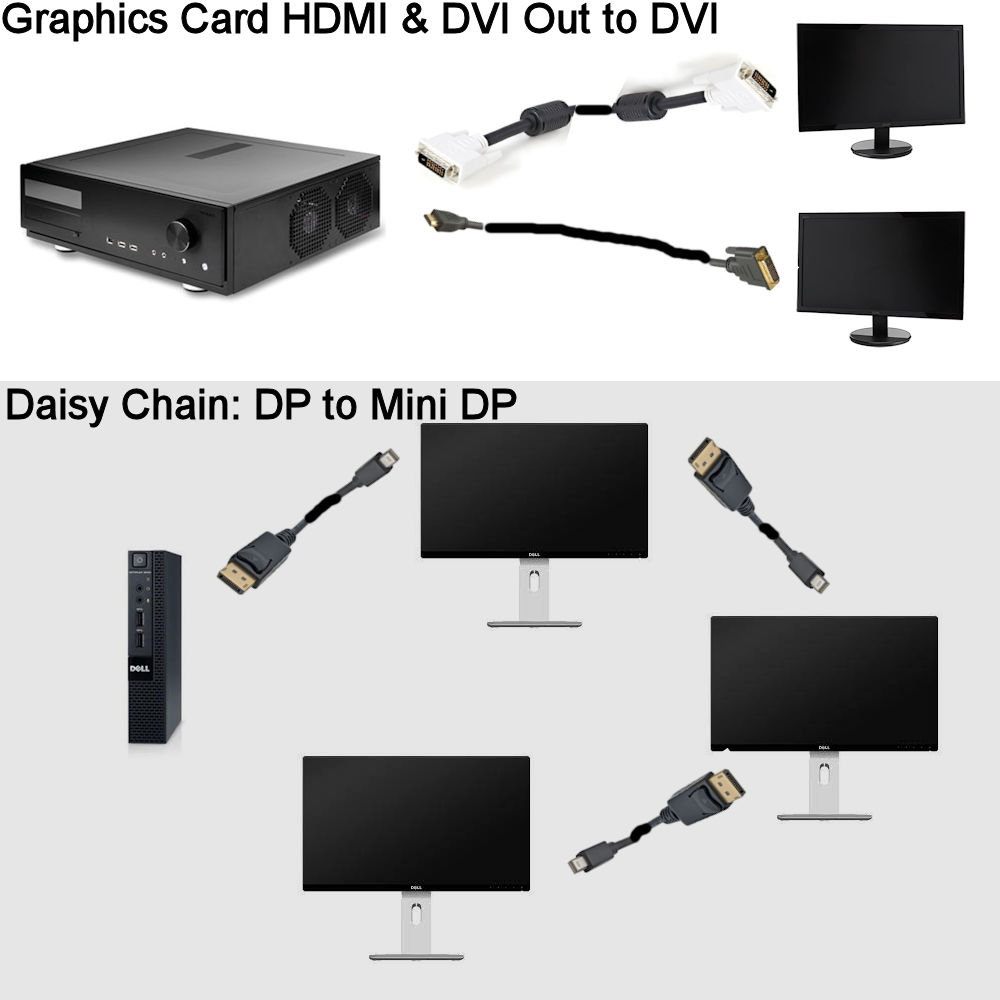
- Home PC has a graphics card with 1x HDMI, 1x DVI, and 1x VGA output ports: I connected the 2 acer monitors which both accepted DVI.
- Work PC has a graphics card with 1x Display Port output port: I connected 1 DP to miniDP cable to the 1st monitor, then another cable from the 1st monitor to the 2nd, and lastly another cable from the 2nd monitor to the 3rd (in other words, a Daisy Chain).
New Setup Diagram:
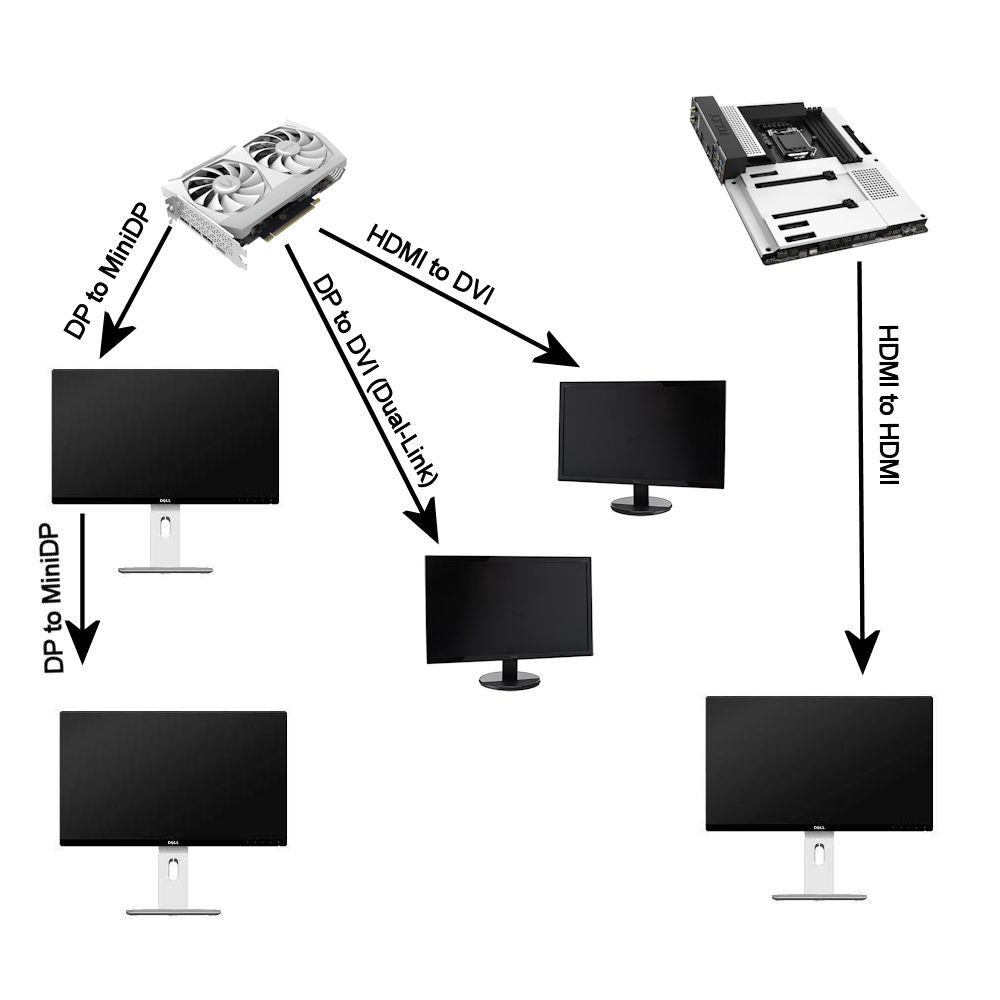
- The graphics card (RTX 3060) can support up to 4 monitors but I only need 2 of the DP ports and the only 1 HDMI port for this to work:
- HDMI to DVI: Graphics Card to one of the Acer monitors
- DisplayPort to DVI (had to purchase this cable - twice as 2nd was dual-link and worked, first single-link didn't) to the 2nd Acer monitor.
- DisplayPort to Mini-DisplayPort: from the Graphics Card DP port to the first Dell monitor.
- DisplayPort to Mini-DisplayPort from the 1st Dell Monitor (which has DP out) to the second Dell monitor.
- The motherboard has a single HDMI output, so I plugged a HDMI to HDMI cable from the motherboard to the 3rd Dell monitor (my acers accept DVI not HDMI). This is the key connection for the 5th monitor and it will use my onboard graphics.
Now for the BIOS:
- Restart your PC
- While it is booting up (displays NZXT logo), bash the "DEL" key every second or so.
- Go to "Advanced" > "Chipset Configuration" > Scroll down to "iGPU Multi-Monitor" and set to "Enabled".
- Exit > Save and Restart
- Login to your Windows > Go to Search > Device Manager > Expand "Display Adapters"
- You should see your Graphics Card listed but as well as a Windows Integrated Graphics or Intel Integrated Graphics option which is disabled > Right-click on it, enable it and select "Update Driver"
- Either via the device manager or just from pure frustration, you should get a prompt to download the Intel Graphics Command Center app from the Microsoft Store (if you don't get prompted, just go get it and install it).
- Install it > Agree to whatever > Restart your PC
- Weirdly, the BIOS will load up on my one monitor connected to my motherboard, but my windows login screen will appear on my central monitor (after further reboots my daisy chained 2 monitors now load the bios logo with the primary monitor displaying the windows login) > Login to Windows
- You should see all 5 screens flicker to life.... Finally! I say the dreaded "should" because it took so many reboots to get to this stage that I lost track of all the different configurations. The 2nd diagram is the working configuration I have now.
- DisplayPort to DVI cable doesn't work: I get what I pay for I guess... I went for a slightly more expensive cable (so from £5 to £9) and the more expensive one worked on my old Acer monitors.
- Adding older GPU in PCIe 3.0 x4 Slot (put in a cheap GPU to run more than 4 screens they said): Stopped my RTX 3060 (in PCIe 3.0 x16 Slot) from extending to multiple monitors (would only display 1 monitor or 2 mirrored monitors)... I solved this by taking the old GPU out and doing the steps listed in this article.
- Originally bought a Corsair 750w White RGB Cooler but it was an ATX power supply and ONLY a SFX PSU will fit in this edition of the Snow White case I'm using.
- If I had to do it again, the 2 glass panels are unnecessary on the O11 Dynamic Mini and air flow isn't perfectly balanced. I'd opt for the O11 Air Mini (newer one) where fans can be mounted to the front and it supports an ATX Power supply.
- I bought 9 Coolmoon fans (3 x 3-packs) but left the 2 fans included with the AIO because 7 of the fans would be on the Coolmoon controller hub and I wanted some color (not a lot, not even Storm trooper) amongst the white. Why is this an error? The Coolmoon fans come with screws which barely fit the fans and when attached to the case, if they were tightened too much, they would go right through the gaps resulting in the fans falling... But the crystal looks nice.
Link(s) / Source(s):
- Microsoft Store: Intel® Graphics Command Center
- YouTube - JayzTwoCents - This might be the best small ATX case... PERIOD!
- YouTube - Gear Seekers - Ghost: ROG 5900X 3080 Lian-Li O11D Mini White Build
- YouTube - PCWorld - Lian Li O11 Air Mini VS O11D Mini - A Spec Comparison Showdown!
Disclaimer
I'm not a PC-builder nor really a hardware kind of guy. My skillset is really around software (see my other articles) and I've been using Mac alongside my PCs for the past 7 years. My MacBook is from 2015 and still runs everything from MacOSX to Final Cut Pro (latest version 2022) and I don't have to pay for each year's software version as I do with MS Windows builds. Saying that, there are a lot of automations and applications I only know how to build in MS Windows rather than MacOSX.
Category: Articles :: Article: 810


Add comment