
This is an article to document how to have two submit buttons on a non-stateless form which both submit the form but one leaves the current record open while the other redirects to the reports view.
Why?
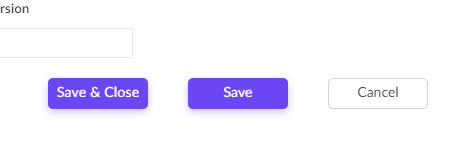
A client wanted a "Save" button on their form as well as a "Save & Close" button. The "Save" button would submit the form but keep the user on the record form. The "Save & Close" button would submit the form and then redirect the user to the report view of the records.
Sounds simple but you can only set a form to redirect to one link and adding a HTML anchor link (<a href>) to the page won't help as you need to submit the form before redirecting the user. A HTML <input type=submit> element to the page won't help either as you need to redirect the user to the specified report after submitting the form.
How?
Well as always, I'm going to cheat. My solution here was to simply repurpose a decision box field in Creator; then re-style it to look like a button; then add a workflow on click of this field.
- Set the form to reload the existing record when it is submitted (either on "Successful form submission", or on properties "On Successful Submission" > "Direct To", or my favorite, Deluge "openUrl()"). Standard as for any usual form without a redirect.
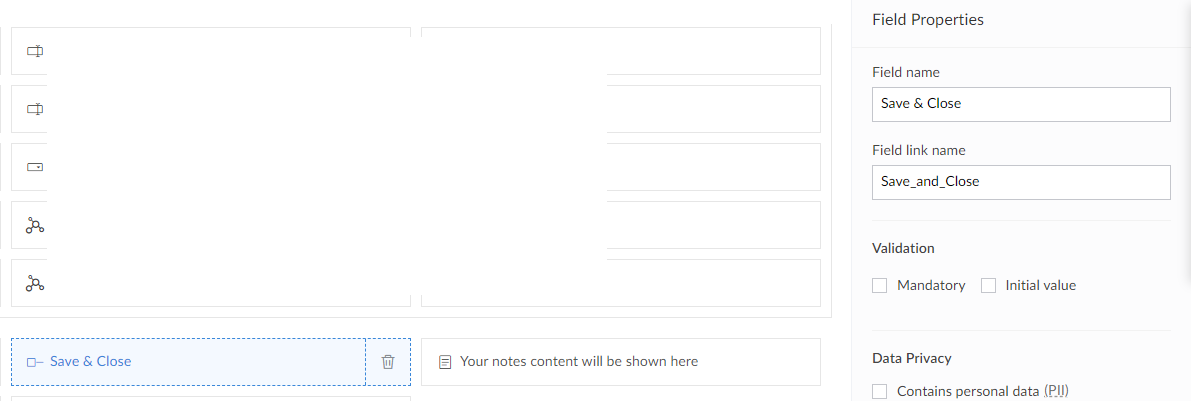
- Drag a decision box field on to the form; we are calling ours "Save & Close" with the field link name as "Save_and_Close" (the field link name is important for the next step: CSS styling):
- Apply the following styling (this will depend on the theme you are using):copyraw
<style> .zc-Save_and_Close-group .decision-box-field label{ display:none !important; } .zc-Save_and_Close-group label{ cursor:pointer; outline:none; text-align:center !important; white-space:nowrap; line-height:19px; height:31px; background-color: #6B47F4; color:#fff !important; font-weight: 400 !important; font-size: 14px !important; padding:7px !important; box-shadow: 0 3px 8px 0 rgb(107 71 244 / 33%); border-radius:5px; width:100px; max-width: 100px !important; min-width: 100px !important; float: right !important; margin-right: 40px !important; } .zc-Save_and_Close-group label:hover{ background-color: #613DEA; } </style>- <style>
- .zc-Save_and_Close-group .decision-box-field label{
- display:none !important;
- }
- .zc-Save_and_Close-group label{
- cursor:pointer;
- outline:none;
- text-align:center !important;
- white-space:nowrap;
- line-height:19px;
- height:31px;
- background-color: #6B47F4;
- color:#fff !important;
- font-weight: 400 !important;
- font-size: 14px !important;
- padding:7px !important;
- box-shadow: 0 3px 8px 0 rgb(107 71 244 / 33%);
- border-radius:5px;
- width:100px;
- max-width: 100px !important;
- min-width: 100px !important;
- float: right !important;
- margin-right: 40px !important;
- }
- .zc-Save_and_Close-group label:hover{
- background-color: #613DEA;
- }
- </style>
- In Workflow > Form workflows > Click on "New Workflow"
- Choose your form
- Run when a record is "Created or Edited"
- When to trigger workflow is "User input of a field"
- Choose Field "Save & Close"
- Name the workflow "OnSubmit_SaveClose"

- Add your deluge code that should:
- Validate the fields (checks mandatory fields have been entered) for example:copyraw
// // check mandatory fields have been entered l_Errors = List(); if(isnull(input.Record_Name)) { l_Errors.add("- Record Name"); } if(l_Errors.size() > 0) { alert "Please enter the following required fields:\n" + l_Errors.toString("\n"); } else { // ... code to submit form/save to record here }- //
- // check mandatory fields have been entered
- l_Errors = List();
- if(isnull(input.Record_Name))
- {
- l_Errors.add("- Record Name");
- }
- if(l_Errors.size() > 0)
- {
- alert "Please enter the following required fields:\n" + l_Errors.toString("\n");
- }
- else
- {
- // ... code to submit form/save to record here
- }
- Then save the data by adding the record or updating the existing recordcopyraw
if(!isnull(input.ID)) { // ... code to update existing record r_Details = myForm[ID == input.ID]; r_Details.Account = input.Account.toLong(); } else { // ... code to create new record r_NewRecord = insert into <formname> [ <fieldname1> = <expression> <fieldname2> = <expression> <fieldname3> = <expression> ]; }- if(!isnull(input.ID))
- {
- // ... code to update existing record
- r_Details = myForm[ID == input.ID];
- r_Details.Account = input.Account.toLong();
- }
- else
- {
- // ... code to create new record
- r_NewRecord = insert into <formname>
- [
- <fieldname1> = <expression>
- <fieldname2> = <expression>
- <fieldname3> = <expression>
- ];
- }
- Validate the fields (checks mandatory fields have been entered) for example:
- Done:
Additional
- Remember that an integration field on the interface is returned as a string and needs to be converted to a number to be assigned, eg:
Category: Zoho :: Article: 754


Comments